Are you frustrated yet? If so, join the club! Unity Visual Scripting (formerly Bolt) was supposed to make our lives easier, and yet, if you’re like me, you’ve entered into a love hate relationship with Visual Scripting. You love it, but it seems to hate you!
This couldn’t be more obvious in the lack of online tutorials about things that should be easy to accomplish using Unity VS, but somehow aren’t.
If you’re here, it’s because you want to make a simple local multiplayer game using Visual Scripting and you’ve scoured the internet for the place to learn how. Well, worry not, weary traveler, you have finally arrived at your desired destination!
Disclaimer
There are a few disclaimers you should be aware of before we jump into this build. First, you should know that I purposely tackled this build using the latest Official Release of Unity, which at the the time of completing this tutorial, October 2021, it is Unity 2021.1.26f1.
Without Unity 2021, you won’t have access to the Unity Visual Scripting package, and will need to download Bolt Visual Scripting from the package manager instead. There are a lot of videos online on how to do this, so I won’t waste my time going into it with you now.
For this build, I’ll also be using the Pixel Art Top Down – Basic package by Cainos from the Unity Asset Store. This is FREE to use and will work perfectly for our example.
We will also need to install the new Unity Input System for this build, and I’ll show you how in just a few minutes.
Before we go there, just let me first say that while the backbone of this build will be carried out using Unity Visual Scripting, you should know that to complete this entirely using VS is not yet possible in Unity using the new Input System. The reason why is because there is a component that we need access to that is impossible to access using Visual Scripting at the moment (hopefully this will change, or I’m just ignorant).
One more thing, in order to accomplish this build, we are going to have to briefly use C#. If I just scared you away, take heart! It’s really not that bad at all! In fact, it’s technically only two lines of code, you’ll see what I mean in a minute! But take my word for it, it’s really, really simple!
Alright, let’s get all cooperative up in this build!
Setting Up the Project
The first thing we’re going to need to do is to create a new Unity Project using Unity 2021.1 or later and creating a 2D project. Name it whatever you want. I’ll name mine, Local Multiplayer:
Once that’s finished compiling, let’s install the new Input System by opening up the Package Manager by going to (Window –> Package Manager). Then select the Packages: Unity Registry, navigate to the Input System tab, and then select Install.
Package Manager Window
When you do this, you should see a warning that looks like this:
This is essentially asking you if you want to bypass using the old input system and instead use the new one (which if you’re wondering the difference, there are some great resources online that will tell you the differences and why you want to be using the new system). Go ahead and select Yes to relaunch Unity using the New Input System.
Next, add the Visual Scripting Graph tab to your build by going to Window / Visual Scripting / Visual Scripting Graph. The first time you use this it will want to go through a short initialization process.
Next, select the Packages: My Assets, find the Pixel Art Top Down – Basic and hit Import to bring in these resources for your build. **Note** – if you don’t have this option, it’s because you need to go to the Unity Asset Store and add this Free Package to your account.
Go ahead and Import everything as shown here:
Once imported, go to Assets/Cainos/Pixel Art Top Down – Basic/Scene and click on the SC Pixel Art Top Down – Basic Scene as shown below:
Once opened you should see a scene that looks something like this:
Before we can use this, we need to make a few changes to our player game object. Select the “PF Player” game object from the Hierarchy and remove the “Top Down Character Controller (Script)” Component.
Next, right click on the “PF Player” Game Object and navigate to Prefab / Unpack.
This will ensure that we can make whatever changes we want to this object without affecting any of the downloaded files.
The next step is entirely optional, but highly recommended with any project. Make a new folder to place the changes we’re making in.
Just for organization, I created 5 new folders. One under Assets called “Changes” and then 4 more folders, Input System, Macros, Prefabs & Scripts.
Setting up the Player
Cainos (the creator of this asset) already set up the player’s animator controller for us, but we’re going to have to make a little change to it. Essentially, the player has 2 layers for the animator. One for Idle/Move, and one for the Direction it’s facing.
We’re just going to make a change to the Direction layer. Under the Animator tab, select each of the animations and delete them like so:
Next, right click on the background and select Create State / From New Blend Tree.
Rename this Blend Tree to Direction (or whatever you want). Right click the Any State node and select Make Transition. Then set the Condition to IsMoving –> True like so:
Next, under the Parameters tab, delete the Blend parameter and add two new float Parameters, one called “Horizontal” and another called “Vertical“.
Next, open up the Direction Blend Tree and after selecting the Blend Tree, set the Blend Type to 2D Simple Directional and set the Parameters to Horizontal and Vertical like so:
Then add 4 new Motion Fields and plug in the following information adding directions and their respective directions on the X & Y axis.
Next return to the PF Player Game Object and rename it to Player. You will probably have to recheck the Animator Component check mark on the Player Game Object since we made some changes to it. Also, add a Script Machine (Flow Machine) Component, and create a new Script Macro called “Player” and place it under the Assets / Changes / Macros folder. You will also need to add a Player Input Component to the player. Your changes should look like this:
There’s one more thing we’re going to need, and that’s to set up the Camera to work with the Player and Input System. Thankfully, Cainos already set up a working script for the Camera. All we need to do is make a couple changes.
On the Main Camera, it should already have it’s target set to the Player so all we need to do on this is to delete the Audio Listener like so:
On the Player Game Object, under the Player Input Component, you will need to drag in the Main Camera. It will look like this:
Next create a new Empty Game Object and call it PlayerParent. Then Drag the Main Camera and the PlayerGame Object underneath it. It should then look like this:
Now drag down the PlayerParent game object into your Assets / Changes / Prefabs folder and turn it into a prefab. It should turn blue:
Setting Up the Input Actions
Before we start putting in our code, we’re going to need to set up an Input Action for the Player. To do this, go to your Assets / Changes / Input System folder, right click in the panel and go to Create / Input Action like so:
A new Input Action will appear, just rename it to “PlayerInput” or whatever you want to call it. Double click it and it should bring up the Input Actions window which looks like this:
Before we set up an action Map with key bindings, we really should consider what kind of input we want our game to have. For the purpose of this tutorial, I’m going to be using multiple Xbox One Controllers, but the Unity Input System is pretty robust and will allow you to use a variety of inputs. What I’m going to show you should work for all manner of controllers.
When you click the “+” next to the Action Maps you should see a new action map appear. I just named mine “Player“. I also renamed my action “Move” and se the Action Type to Value and Control Type to Vector 2 like so:
For the Binding I selected the <No Binding>, moved to the right, Clicked Listen and then moved the left thumbstick for the controller I had plugged in. When you do this, you should see that it says Left Stick [Gamepad]. I selected that. While I could have said Left Stick [Xbox Controller], I’ve found that the Gamepad does everything I need it to do just fine and is versatile across the board. When you select your desired button, be sure to hit Save Asset at the top to save the changes.
The C# Script
Now for that pesky C# Script referenced earlier.
In order to access this component, we will need to create a small C# Script and create a variable with this information. As promised, it’s really simple. In fact, this is all the C# you’re going to need:
In this Script, we are just creating a Vector 2 variable called “movement” and when we trigger the “OnMove” Unity Input Action, we are setting the “movement” variable to whatever the movement is on the controller (or device) you’re using. It’s probably easier if you create your own macro, but if you want, you can simply copy or download the script I created here.
Once created, save your script. Now go to Edit / Project Settings. Under the Project Settings tab, navigate to Visual Scripting, click the Type Options drop down, and add the PlayerInputSystemScript and click Re-generate Units like so:
We just need to make a couple more changes to our player so that we can call the information we need and make our visual scripting graph. Select the Player Game Object, under the Player Input Component navigate to Actions and change the Actions to the PlayerInputInput Action Asset we created earlier. Also change the Behavior to Invoke Unity Events.
Next add the PlayerInputSystem C# Script to the Player and click the Events drop down under the Behavior tab. You should now see a new drop down called Player and under it, the Move (CallbackContext) which we referenced in our C# Script. Create a new Callback, drag in the PlayerInputSystem Script off this Game Object and then select the PlayerInputSystem / On Move function from the list. Next, drag the ScriptMachine into a new callback, select FlowMachine / Trigger Unity Event, and name it onMove like so:
We also need to add one object variable called Speed to the PlayerVariables Component and set it as a Float with a value of 3 like so:
Go back to your PlayerParent Game Object, select Override and then select Apply All to apply all the changes to your prefab.
Also, I forgot to add that all the transforms on the Parent, and Children need to be set to 0,0,0!
The Visual Scripting Graph
We now need to click on the Player Script Graph and create the following node:
I realize this might look overwhelming, but it’s actually very straight forward. The first thing we need to do when we Enable this Game Object is create a isMoving Graph Variable. We do this on enable so it will automatically be taking care of when this game object is instantiated.
Next we use a Unity Event Node with the onMove string we set up earlier. Whenever this is triggered, we set the isMoving Graph Variable to True and set the IsMovingAnimator Bool to True as well. This will not only allow us to move, it will look like the player is moving through the animator. We then use a check system to determine if the movement from the Player Input System script is equal to 0,0. In other words, if we’re not pressing on the left thumbstick, we want the player to stop moving and for the animator to turn off. So if the player has stopped moving, that’s exactly what we’re doing. We’re setting the isMoving Graph variable and the IsMovingAnimator Bool to false.
But if the player is moving (and the left thumb stick isn’t set to 0,0) then we set the Animator Parameters Horizontal and Vertical to the X and Y of the movement on the input device.
Last, if the isMoving Graph variable is True, then we set the Velocity on the Rigidbody 2d to equal the movement from the C#Script. If isMoving is false, we set the Velocity to 0. It’s really that simple!
Setting Up the Multi-Player Function
The last thing we need to do is set up the Multi-Player Capability. We do that by creating a new Empty Game Object and call it PlayerInputManager.
Then add a Player Input Manager Component to it and set the following settings:
Reset the Transform to 0,0,0, and under Joining set the Join Behavior to Join Players When Join Action is Triggered. You can now add a new Binding for joining. For me, I chose the start button on the gamepad but you could either leave it to Join When Button Is Pressed or could set it to whatever button you want. I set my action because I only want players to join when a Gamepad presses start (because you can have players join by pressing keys on a keyboard and clicking the mouse).
Next Enable Split-Screen and Set Fixed Number and specify how many people you want to be able to join. I chose 2, but you could choose as many as you want.
Last, drag in the PlayerParent Prefab (from the Folder, not the Hierarchy) as the Player Prefab.
Be sure to apply any changes to your prefab by selecting Overide, Apply All, then delete the Prefab from your Hierarchy.
Hit start and have some fun with your Local Multiplayer Game!
Bonus Content
One feature you might want to incorporate is how to change the skin of the players you want to add. You could do this in a variety of different applications, but I chose to simply change the color of my little cats. To do this, go to your PlayerParent Prefab, select the Player Game Object and add a new Scene Variable called PlayerColors. Make this a List of Colors and then select how many colors you want to have, one for each player.
After setting the Variable, simply add a Set Sprite Renderer Color node to get the first color of the list for Player 1 then delete that color off the list so that Player2 gets the next color and so on.
Also, if you want to have more inputs than just movement, simply go into your Player Input Action Map, and add a new Action. I called mine “Action“, and bound it to the South Button on a Gamepad (A Button on Xbox One Controllers) like so:
Then you can add a new Action Callback called “Action” to your Flow Machine on the Player Game Object like so:
And trigger the event like this:
Now when you press the “Action” button (whatever yours is set to) this function will carry out.
Last you might want your player to spawn in a different location. For this I created a new Empty Game Object called Spawn Location put it in my scene, and then while on my player I created a Scene Variable called SpawnLocation which is a Game Object and drug in the SpawnLocationGame Object. I then added the following to my graph:
Conclusion
Although not completely accomplished using Visual Scripting, you gotta admit, it was pretty darn close, right? I hope you enjoyed the tutorial, I certainly had a lot of fun making it. More accurately, I had a very frustrating time making it, but when I got it to work you better believe I was dancing all over my house!
Holy crap, dude! There’s just nothing on this subject using Visual Scripting! If you share my frustration, maybe you’ll be motivated to support people like me who make tutorials on Visual Scripting. My goal is to help fill the gap on how to use this awesome resource and make coding just a little easier for people like you!
If you’d like to support me onPatreon just follow the link!
Welcome to the Enemy AI Section of my Complete 2d Player Controller Series! A functional Enemy AI has been the most requested tutorial series on my channel, and thanks to the poking, prodding, and pleading of my Patreon supporters, I decided to bring this tutorial series to you.
Disclaimer
Before we get started with this build, I highly recommend that you first complete My Complete 2d Player Controller series before attempting this build. There are a few things (like giving and receiving damage to and from the player) that you will need to have in place to fully be able to test out the features and functions of this enemy AI.
I would also like to note that while the Skeleton Enemy AI will be available to everyone, as my way of saying thank you to my Patreons, I am reserving the Flying Eye (Flying Enemy) and Glow Worm(Projectile Firing Enemy) for myPatrons who have access to early content ($5 pledge and up). This is not only my way of building support onPatreon, but also my way of saying, “I love you guys!” to all my Patrons!
For this build, I’m going to be working with the Completed Player Controller Project Files. My topPatreonSupporters can access this file via my Patreon Page (located here). Everyone else is welcome to complete My Complete2D Player Controller series at their own leisure via my YouTube Tutorial Series (located here).
I would also like to note that instead of using C# in this build, I will be creating this Enemy AI character using Bolt Visual Scripting. If you’re going to follow along with this build, you will most certainly need this installed. I go through this setup process in Video 1 of My Complete 2D Player Controller, so go check that out if you need help!
Are you ready to dig in? Alright! Then buckle up, because this is going to be a long one!
**It should take somewhere between 2-3 hours minimum to complete this build**
Once you download these sprites, you’re going to need to import them into your Project. I recommend creating new folders as you need them. For example, my sprite files are sitting under the Assets/PlayerController/Sprites/Enemy folder. I also setup a new folder for the Skeleton (because I’m super OCD about organization!).
Once you get it imported, it should look something like this:
Setting Up The Skeleton Sprites
First things first, you’re going to need to correctly setup the sprites in the Inspector Window. Most of the Sprites will look like this:
Inspector Settings For All Skeleton Sprites
Start by selecting all of them and changing the Sprite Mode toMultiple, the Pixels Per Unit to 35 (This number might be different for you if you’re using different sprites), Filter Mode toPoint (no filter) so that your pixel art sprites aren’t blurry, and Compression to None.
In the future, we will need to make a couple changes to the “Shield” Sprite and the “Death” Sprite, but we will make those adjustments later on when it becomes necessary.
Last, you will need to select each individual Sprite and click the Sprite Editor button in the Inspector Window.
In order to get multiple sprites, we’re going to need to Slice the image up using the Sprite Editor.
Sprite Editor Window for the Idle Animation
For each sprite, click the Slicedrop down menu. Then under the Type select Grid By Cell Size. The Pixel Size needs to be set to 150 x 150. Once these settings are applied, click Slice, then Apply.
Again, you will need to do this for each sprite in your SkeletonFolder.
When you are done, it will look something like this:
Sliced Up Sprite Files
Setting Up The Animations
Next you’re going to want to drag in a single Skeleton sprite and place it somewhere into your scene (I recommend using “Idle 0” since it’s the standard image).
Also, you will probably want to set the following settings in your Sprite Renderer Component on the Skeleton Game Object:
Setting the Sorting Layerto Player (if you don’t have it, add a new layer and call it Player) will allow the Skeleton’s Sprite to Render in front other Objects.
Clicking in your Hierarchy Tab, you will then want to rename Idle_0 to Skeleton.
Hierarchy Window
Next, click on your Skeleton Game Object, and open the Animation Window (Window/Animation/Animation).
Next we’re going to want to create some Animations using the Sprites we sliced up by clicking the Create Button.
If you’d like to stay organized, you’re going to need to create some new folders for these animations to sit (otherwise, they will sit under your sprite folder). So, as you create these animations, I recommend creating the following directory:
You will need to create the following animations by typing in the name of the animation, one at at time, and clicking Save as shown below (make sure you are placing these animations inside your newly created animation folder):
Next, click the Animation Selection Drop Down and Create New Clip…
Repeat this process until you have all the desired animations created are created. This is my complete animations list for the Skeleton Game Object:
Complete Animation List for Skeleton Game Object
You will also notice that you will have a SkeletonObject (Don’t Delete it!). Because you created animations on your Skeleton Game Object, Unity automatically added an AnimatorComponent. This SkeletonObject is the Animation Controller that your Skeleton Game Object references in the Inspector Window as shown below:
Creating the animations themselves is a relatively easy process. Navigate back to your SpritesFolder in the Project Panel, click the drop down for the selected Sprite, select all of the Sliced Sprites per animation, and drag the selection into the Animation Tab under the appropriate animation. You will also need to set each of the AnimationSamples to 10 (the lower the number, the slower the animation). Now when you click Play, you should see your skeleton animating in your scene.
Idle Animation for Skeleton Game Object
Repeat this process for each of the Skeleton’s animations. One last thing, then we’ll be ready to begin coding; and that is to turn off the Loop Time by double clicking on each Animation in the Animator Window and unchecking theLoop Time check box.
Quick Note on Animations
Believe it or not, I’ve learned a lot since designing My Complete 2d Player Controller. Since that time, I’ve learned how to escape ANIMATOR HELL with all the lines and stupid parameters to trigger animations! For example, this is the animator nightmare I previously built with the 2d Player Controller:
Example of Animator Hell (Believe it or not, this is still very organized!)
The good news for this build is we will not be using the Animator to control our animations! Instead, we will call each of the appropriate animations in our Visual Script. So do a little victory dance and enjoy yourself as we completely bypass the use of the Animator! I’ve taken the liberty of arranging the Animations in the Animator. Not only will this be the final Skeleton Animation Controller for this build, you should also notice that there are no stupid lines and parameters! God Bless America!
Skeleton Animator Controller
Adding Components
The last thing we will need to do before we start designing our Enemy with Bolt Visual Scripting is to add the necessary Game Object Components.
The first thing we’re going to add is a Rigidbody 2dComponent by selecting the Skeleton Game Object and in the Inspector Window select Add Component, type in “Rigidbody 2d” in the fuzzy finder, and select the Rigidbody 2d Component as shown below:
Next, set the Collision Detection to Continuousand FreezeRotationon the Z Axis by checking the box.
Rigidbody 2D Settings for Skeleton Game Object
Next add a Capsule Collider 2D Component and set the Direction to Vertical and the Size of this Collider to 0.5 on the X and 1.5 on the Y. It should look like this on the Skeleton Game Object in the Scene View.
Capsule Collider 2D Settings for Skeleton Game Object
Next add a State MachineComponent to your Skeleton Game Object, click the NewButton, and navigate to where you want to save your new State Macro (I created a new folder – Assets/PlayerController/Macros/Enemy/Skeleton) name the State Macro, “Skeleton” and click Save as shown below:
State Machine Component for the Skeleton Game Object
Creating the Object Variables
Instead of having to refer back to the Variables Window every time we need to make a new Object Variable, I’m instead going to give you a list of all the variables you will need for this Skeleton Game Object. This will significantly speed up the process as we build the needed Flow Macros in the future. This is the complete list you will need to proceed with this build (I’ve also included a list of what each of these variables is for):
Object Variables for the Skeleton Game Object
Variable
Type
Setting
Purpose
Health
Integer
3
Total Enemy Health
Speed
Float
1.5
Movement Speed when not in Combat
ChaseSpeed
Float
3
Movement Speed when in Combat
AttackDamage
Integer
1
Damage to the Player
AttackCD
Float
1
The Cooldown between Attacks
VulnerCD
Float
1
The Amount of Time after attacks before Blocking is enabled and the player remains Vulnerable
VulnerTime
Float
0
The Variable to Track how much time has passed since last attack
AttackRadius
Float
1
The Radius of the attack
AttackInt
Integer
0
Tracks which attack the Skeleton will use (Attack1 or Attack2)
X
Float
1
The direction the Skeleton is facing/attacking
AgroRange
Float
4
The range from the Player at which Combat Mode is enabled
LeaveAgro
Float
7
The range from the Player that the Skeleton returns to Non-Combat Mode
Pushback
Float
3
The amount of distance the player is pushed back when the Skeleton Blocks
Combat
Boolean
False
True or False in or out of Combat
CanAttack
Boolean
True
True or False that the Enemy can Attack
BlockedRight
Boolean
False
True or False that the Enemy can move Right
BlockedLeft
Boolean
False
True or False that the Enemy can move Left
Dead
Boolean
False
True or False that the Enemy is Dead
InRange
Boolean
False
True or False that the Player is in Range for Attack
Block
Boolean
True
True or False that the Enemy can Block
Idle
Boolean
False
True or False that the Enemy is Idling
Skeleton Game Object Variable Settings and Purpose
Before you continue, Make sure you check and double-check all the spelling of these variables! All these Object Variables might seem foreign and overwhelming at the moment, but don’t worry, it will make much more sense and seem less and less complicated as we progress forward with this build!
Game States
For this build, we’re going to be using both State Macros and Flow Macros. The difference between a State Macro and a Flow Macro is that State Macros can determine which Game State we want to be in and contain Flow Macros and give us the ability to switch between which Flow Macros we want to be using. For example, in this build, we will have a Combat State Machine with several Flow Macros inside of it like Chase Player vs. Attack Player (we will only want one active at a time). If this is confusing, hopefully this will make more sense later on.
Under the State GraphWindow you should see a Flow Macro called Start. We’re going to rename this to “State Handler” in the Graph Inspector Window.
State Graph for the Skeleton Game Object
Now we need to right click in the blank State GraphWindow and create a new SuperState and call it Non-Combat. Repeat the process and create one called Combat and place them like so:
Next create 3 more Flow States called, Hurt, Dead, and Block and place them like so:
Next, Right Click the Non-CombatSuper State and click Make Transition and drag a transition from Non-Combat to Combat like so:
You will need to make the following Transitions:
These Transitions Include:
All Transitions for Skeleton State Graph
We will finish setting up these states as we continue. For now, we’re just saving time by knocking out all the transitions at once.
Next, right click on the Non-CombatSuper State and select Toggle Startwhich will turn the Non-Combat green. What this is doing is telling Unity that when we start the game, this is the default macro that the SkeletonGame Object will start in.
You may also notice that the State HandlerFlow Macro is also green. This is because the State Handler will be running all the time and will never make a transition. In fact, it is the State Handler Flow Macro that will determine when it’s time to switch between all the available States in this State Machine.
Non-Combat Mode
There are actually two states the Skeleton will have while not in combat; the Idle State and the Walk State. But because the Walk State will have three separate Flow Macros (Left, Right, and a Flow Macro that will decide which direction to travel) it will need to be a Super State.
So you will need to create an Idle Flow State (you can just rename the Start) and a Walk Super State with transitions to and from each as shown below:
Non-Combat Super State
Then inside the WalkSuper State, you will need an Enter Flow State (rename the Start), with Transitions to a Left Flow State and a Right Flow State as shown below:
Walk Super State
Navigate back to the Non-Combat Super State and open up the Idle Flow State. It should look like this:
Idle Flow State
Delete the Update and On Exit State nodes; you won’t need them for this Macro. Instead, we’re going to add the following Nodes:
You can add these nodes by Right Clicking in the Graph and typing in the name of the node you’re looking for. In this case we’re going to look for an Animator Play (State Name)node. Repeat the Process for a Random Range node, Timer node, and Trigger Custom Event node.
Let me briefly explain what this graph is going to do for us. Whenever we Enter the Idle State, the On Enter State node we tell the Animator to play the State Name“Idle”. This is how we’re bypassing the Animator Hell with all the transitions and lines. We simply play the Idle Animation when we enter the state (cool, huh?). Next we’re going to set a Timer to tell the Skeleton to trigger the Walk Custom Event between a Random Rangeof 1 to 3 seconds. This will give the Skeleton a little bit of a mind of it’s own to decide when it wants to move.
Next Navigate back up to the Non-Combat Graph and double-click on the Transition from Idle to Walk as shown below:
Non-Combat Super State
We’re now going to add aCustom Event node and type in “Walk” in the String area.
Transition from Idle 2 Walk (Top) & Idle Flow State (Bottom)
Think of this node as a Wireless receiver for the WalkCustom Event we triggered in the IdleState Machine. When the Idle State triggers the Custom Event, this is the effect: it will trigger the State Transition. Also note that before we trigger the State Transition, we’re going to tell Unity to Play the “Walk” Statein the Animator. This way, whenever we enter the WalkState, the correct animation will be playing!
For the Walking Super State, we will first start walking on the Enter Flow State. Begin by deleting the Update and On Exit State nodes, and adding the following nodes instead:
Enter Flow State
Once again, we’re going to use a Random Range(MAKE SURE YOU USE THE INTEGER RANDOM RANGEand not the Float) node to randomly decide between the numbers 0 and 2 this gives us a 50/50 chance to go left or right. We then run this unit into a Branchwhich will determine if the number is Greater or Equal to 1. If it is Greater than 1, we will go Rightwith a Trigger Custom Event. If it isn’t Greater or Equal to 1, we will go Left with a separate Trigger Custom Event.
The Left and Right Custom Events are to be placed into each of the corresponding Transitions from Enter to Left and Enter to Right as shown below:
Walk Flow StateLeft Flow StateRight Flow State
It’s now time to create our First Super Unit! Whenever we create something that will be used over and over again (in this case, Moving the Skeleton Game Object) the best practice is to create a Flow Macro Super Unit. This way it not only becomes more efficent and fast to write out code, if we need to make changes to this Super Unit in the future, we can just change it in one place!
(You will already have this if you followed My Complete 2d Player Controller Series, If you already have it, just skip to the next part.)
To create a Flow Macro Super Unit, right click in your Project Folder (under the Assets/PlayerController/Macros/Enemy/SkeletonFolder) and click Create –> Bolt –> Flow Macro and name it “MoveVariableTransform” as shown below:
Inside this Super Unit Flow Macro, let’s add the following nodes :
The Move Variable Transform Flow Macro Super Unit
Let me break this Flow Macro Down for you:
On the far left hand side of this graphic, you will notice that this Macro will need the following Control Input & Control Output, as well as a couple Value Inputs:
Move Variable Transform Input & Output Settings
The Control Input/Output allows us to send a Flow inside the graph. The Value Inputs are both Floats and by checking the Has Default Value, it allows us to edit this number outside of the Graph.
Move Variable Transform Super Unit
First we’re going to begin by adding an Inputnode, and run the “Input”Flow into a Transform Set Position. This is what’s going to allow us to move the Skeleton Game Object. We do this by first Getting thePosition of the Skeleton Game Object, and using a function called a Lerp (which stands for Linear Interpolation). This will take the Game Object’s Current Position, and add the Multiplier(which will be set to either positive or negative 1), Multiply that against the Speed, and after plugging that into the X node of a Vector 2 node, we’re going to add where we are, to the direction we want to move over time (which is controlled by the LerpFunction) and is determined by a Get Delta Time unit (something that is unaffected by frame rate). Finally, we run the flow into the Output node. Whew!
Once you have created this Super Unit you should be able to find it in your fuzzy finder search bar inside any graph as shown below:
Inside the Left Flow State, create the following Graph:
Left Flow State
For this we’re going to use an Update node, and run the flow into the Input of the Move Variable Transform Super Unit. For the Multiplier we’re going to use the X Object Variablewe created before. For the Speed, we will use the SpeedObject Variable.
Then we want to essentially create another Random decision between 1 and 3 seconds, to Trigger the “Idle” Custom Event.
Once completed, we will then place the Custom Event reciever in this Transition from the Walk Super State to the Idle Flow State here:
Transition From Walk Super State to Idle Flow State
We will then reopen the Left Flow State and copy all of it’s contents and paste it inside the Right Flow State like so:
You may be wondering If we are just copying and pasting, why didn’t we create a Super State?Well, the answer is because at the moment, this will be the exact same, but in the next section, we will be adding a slight difference.
The last thing we need to do is trigger the Walk Animation and Flip the Sprite Renderer on the X when we move Left or Right.
We will then place the following inside the Transition from Enter to Left:
Transition from Enter To Left
Here we run the LeftCustom Event into a Sprite Renderer Set Flip X and the boolean needs to be set to True. The reason we’re doing this is because our Sprite is facing the right by default; therefore whenever we move Left, he needs to be facing Left. Also, because we’re using the X Object Variable as our Multiplier in the Move Variable Transform Super Unit, we’ll set the Float to -1 so that he will move Left on the X Axis.
The logic will be exactly the same for the Transition from Enter To Right , just the opposite like so (we set Flip X to False, and the Float to a Positive 1)
Transition from Enter To Right
Now when we hit play, we should see that our Enemy wanders from Left to Right at Random intervals. Sweet!
Working Out the Kinks!
Have you discovered a problem? The Enemy walks into walls and off of ledges! Oh no! How do we fix that?!? Well, I’ll show you!
We’re going to start by creating a new ChildedGame Object that will sit under the Skeleton Game Object and name itBlockedR. This Game Object’s Transform will be set to0.35 on the X and 0 on the Y & Z. Add a Box Collider 2dComponent and set the Size to 0.1 on the X & Y. Also give it a Flow MachineComponent and set the Source to Embed. Then repeat the process and create another Game Object, under the BlockedRGame Object, call it LedgeCheck, add a Flow Machine Component and set the Source to Embed. It should look like this when you’re done.
Inspector Settings for the BlockedR Game Object
Then repeat the process for the opposite side. It will also have a Box Collider 2d Component, and a Flow Machine Component that is set to Embed. The only difference between this and the other is that this one will have it’s x position set to a -0.35 instead of 0.35, set the Size to 0.1 on the X & Y, and name it “BlockedL“. You will also give it a Childed Game Object called “LedgeCheck” that has a Flow Machine Component that is set to Embed. Your overall progress should look like this:
In order for the Skeleton to keep from walking off a ledge, we’re going to want to fire a line downwards from this Game Object, and if it doesn’t hit anything, the Skeleton needs to stop moving in that direction. Starting with the BlockedRLedgecheck Game Object, we will use a Physics 2d Raycast, make sure you select the one with (Origin, Direction, Distance, LayerMask) from the fuzzy finder as shown below:
Now create the following graph in the Embedded Flow Macro on this Game Object:
LedgeCheck (BlockedR) Embedded Flow Macro
The Physics 2d Raycast’s Origin needs to be set on the Position of this Game Object, and the Direction needs to have the X set to 0, and the Y set to -1 (This will send the line downward). The Distance needs to be set to 1, and for the Layer Mask, we’re going to use a Layer Mask Literal node and set the Layer to Platforms. The Branch will determine if the Object hit is the on the Platforms Layer Mask, if it is, it will set the BlockedRight Object Variable to False (allowing the Skeleton to continue to move Right). If the Object hit isn’t on the PlatformsLayer (or if nothing is hit) it will set the BlockedRight Object Variable to True (which our code will refuse to allow the Skeleton Game Object to move Right any further).
Keep in mind that we have to use the TransformGet Parent node two times here because the BlockedRight Object Variable is on the Skeleton Game Object not the BlockedRGame Object. For this we get the Parent (Skeleton Game Object) of Parent (BlockedR).
We will repeat this action for the BlockedLGame Object and the LedgeCheck Game Object that sits underneath it. The only key difference with this macro is that instead of a BlockedRightObject Variable you will use a BlockedLeft Object Variable. It will look like this:
LedgeCheck (BlockedL) Embedded Flow Macro
Next, go ahead and make the On Trigger Exit and EnterSuper Unit Flow Macro if you don’t already have it from My Complete 2d Player Controller Series. It looks like this:
Make sure you set the Has Default Value To True check box on the StringType Value Input or you won’t be able to edit this macro outside of the graph. Once you get this one made, add the following nodes to the BlockedREmbedded Flow Macro:
For this graph, make sure you enter the string “Platforms” in the Tag area on the On Trigger Enter & Exit Super Unit. When the Box Collider2d is triggered, it will turn the Flow Machinecomponent on the Ledge Check Game Object to False. This will ensure that it doesn’t interfere with the BlockedRightObject Variable when the Skeleton walks into a wall (otherwise, your BlockedRGame Object will trigger, turn the BlockedRight Object VariableOn, but the LedgeCheck will just turn it back Off again). When the Trigger Exits, we set the BlockedRight Object Variable to True.
Next we need to make a little change to the Left and RightFlow States under the Skeleton Game Object.
The Walk Super State under the Skeleton Game Object’ State Machine
Under the Left Flow State add the following nodes:
The Left Flow State
Here we’re simply adding a BlockedLeftObject Variable check by running the Object Variable into a Branch node. If it’s True, we’ll send the flow into an Idle Custom Event. If it’s False, we’ll let the Skeleton move as usual.
The Right Flow State is almost identical except instead of a BlockedLeftObject Variable, we’re going to use a BlockedRight Object Variable. The rest is the same as shown below:
The Right Flow State
For the Enter FlowState we need to add the following Game Logic:
The Enter Flow State
All we’re doing here is running a check, that if the Random Decision decides to go Left, we will check the BlockedLeftObject Variable. If it’s set to True, then we will go Right instead. If it’s False, then we’ll allow the Skeleton to move Left. For the BlockedRightObject Variable the same logic applies, just in Reverse. IfBlockedRightis True, it will travel Left. If it’s False, it can then go Right if it decides to. Pretty simple logic, right? (If you’re confused, just nod and pretend that you get it, :P).
One more change and we’re all set for the Non-Combat Mode. Select both the BlockedR and the BlockedLGame Objects and set the Is Trigger option in the Box Collider 2DComponent to True.
BlockedR and BlockedLBox Collider Settings
Now when you test out the progress you should see that the Skeleton Game Object doesn’t walk off the edge and will stop walking when it runs into a wall!
Combat Mode
Alright, now that Non-Combat Mode is complete, let’s take a look at the Skeleton’s Combat Mode. Essentially what we need to have the Skeleton do for Combat Mode is detect the player, chase the player, and when it gets close enough, attack the player.
Let’s begin by determining where the Skeleton should attack the player. Create a new Flow Macro in your project folder (I placed mine in Assets/PlayerController/Macros/Enemy/Skeleton) and call it “AttackPoint“.
For this Macro, build the following nodes:
For this macro, we’re starting with a Custom Event with Attackin the String. This runs into aPhysics 2d Overlap Circle (use the one with Point, Radius, Layer) that will use this Game Object’sPosition (it doesn’t have a game object yet) and create a Circle the size of the Skeleton’s Attack Radius (we use the Get Parent to grab this Object Variable because it will be on a childed Game Object). We also look for the Player Layer Mask. We run this into a Null Check because if the circle doesn’t hit anything, we don’t want anything to happen. If it’s Not Null (meaning it hit the player), we will Trigger Custom Event. Special Note on this one, it has an Argument of 1 because we’re going to send information through the custom event. What we’re going to send is the Attack Damage on the Parent (Skeleton).
This bottom section is purely for our visual understanding of where the circle is happening. We use an On Draw Gizmos Selected node (which means it will only trigger when this game object is selected in the HierarchyWindow), Set the Color of the Gizmo to Red, and Draw A Wire Sphere using the Position of this game object as it’s Center and the Attack Radius Object Variable as the RadiusSize.
Next we’re going to create two more Empty Game Objects under the SkeletonGame Object. Call one AttackR and the other AttackL. Assign a Flow Machine to both, and assign the AttackPointFlow Macro to them.
The AttackR Game Object will have it’s transform set to X=1.1 Y=0.05 Z=0. This will position this game object to the Right of the Skeleton. After you’re finished it should show an indicator as to where this Attack Point will be, like so:
AttackR Game Object Settings
The AttackLGame Object will have it’s transform set to X=-1.1 Y=0.05 Z=0. This should position this Game Object to the Left of the Skeleton. After you’ve finished it should show up like the example below:
AttackL Game Object Settings
Now that the method we will deliver damage is in tact, let’s focus on chasing the player.
Chasing the Player
To chase the player, we need to first determine when the Skeleton will stop patrolling and start running after the Player. For this Game Object, we will do this by calculating the distance between the Skeleton and the Player. Before we do this, however, we’re going to have to create some more infrastructure for the Super State.
Open the Combat Super State and place the following nodes:
Combat Super State on the Skeleton Game Object
For this, we just renamed the StartFlow Macro to Idle, created two more Super State’s, named one Attack, the other Chase and made Transitions to and from Idle on each.
Next create a new Flow MachineSuper Unit in your Project Folder (I put mine under Assets/PlayerController/Macros/Enemy/Skeleton) and call it PlayerXPosition. This one is pretty simple:
PlayerXPositionFlow Macro
This one just checks the X Position of this Game Object and sees if the X is Greater than the X on the Player’s X Position (we use an App Variable here because we established the Player Game Object as an App Variable in the Complete 2d Player Controller Series). If the X on the Skeleton is Greater than the X on the Player, then the Player is to the Left of the Skeleton, otherwise the Player is to the Right.
Next we will add the following nodes to the IdleFlow State under the Skeleton’sCombat Mode:
Idle Flow State under the Skeleton Game Object’s Combat Mode
Don’t let this one intimidate you. All we’re essentially doing here is a series of checks to ensure that nothing happens when certain parameters are true.
On Enter State, we Play the Idle Animation (we do this when the Skeleton is close enough to attack, but just can’t). Next we do a series of checks. Is the Skeleton Dead (we run this because we don’t want any attacks or moving happening when the Skeleton is going through it’s death sequence)? Is the Skeletonin Range (if so, we move to the next check, if not we move to check the Player’s X Position and if the Player is to the Left/Right and isn’t Blocked in that Direction then it will move to see if the Skeleton is Idle, and if not, then enter the Chase State)? If the Skeleton is in Range, then it will ask Can the Skeleton Attackthrough the CanAttack Object Variable(is the Skeleton‘s attack off of cool down)? If it is we will Trigger the Attack Custom Event.
The Chase Super Unit will have the following Structure:
Chase Super Unit Macro
For this we rename the StartFlow Macro to “Enter” and create two more Flow Macros, naming one Left and the other Right. We then make Transitions from Enter to both Left & Right and add Transitions from Left to Right and Right to Left.
Enter Flow State Macro
For the EnterFlow State Macro you need to create the following Macro:
Enter Flow State Macro
Again, don’t let the amount of things intimidate you; all this Flow Macro does is decide to Activate the Left Flow State Macro or the Right Flow State Macro, or return to Idle.
You should note that it does Play the Walk Animation as it Enters this State. It then checks to see if the Idle Object Variable is True; if it is, it will trigger the Idle Custom Event. If it isn’t, it will check the Player’s X Positionthrough the Super Unit we created earlier. It will then check if it’s BlockedLeft or BlockedRight (because we don’t want the skeleton to try to chase a player off a ledge); and if it’s false, it will Trigger either the Right or LeftCustom Event. If it is True, it will return to Idle.
The bottom section is what determines if it’s time for the Skeleton to return to Idle. There’s a new unit in this Flow Macro that we’ve never used before, the Distance(vector 2) node. The Distancenode is useful for plugging in two Positions and converting the space between them into a Float. In this case; if the Distancebetween the Skeleton Game Object and the Player Game Object is Less than 1.5, it will Trigger the Idle Custom Event (I’ll show you where each of these Custom Events come out in a little bit).
Left Flow State Macro
For the Left Flow Macro you need to create the following Macro:
Left Flow State Macro
This one is pretty self explanatory with a few notable points. When we Enter the Left State, we will check the Skeleton’s Idle Object Variable. If it’s True we will return back to Idle with the Idle Custom Event Trigger. If it’s False, we then need to Flip the X on the Sprite Renderer, and set the X Object Variable to -1.
For the Update node, we check if the Skeleton is InRange of the Player to Attack, if it is, we will change states back to Idle via the Idle Custom Event Trigger. If it isn’t we will check if it’s BlockedLeft, if it is, Idle State, if it isn’t, we will move the unit with the Move Variable Transform we used in Non-Combat with the exception being the ChaseSpeed will be plugged into the Speed node this time.
The Right Flow State Macro will look almost identical to the Left Flow State Macro with 3 Minor Changes:
Right Flow State Macro
We will set the Sprite RendererFlip X toFalse, set the X Object Variable to 1, and we will check to see if the Skeleton’s Object VariableBlockedRight is True or False (instead of BlockedLeft).
Thee Transitions between these states will be as follows:
The Transition from Enter to Leftis a simple Custom Event with Left being entered into the string. The Transition from Enter to Right is the same thing except Right is entered into the String. For the Left to RightTransition, we use an Update Node and if the Player’s X Position is ever to the Right during the Chase sequence, it will immediately Transition to Right and Vice Versa for the Right to Left Transition (although this should never be the case because it should transition back to idle once in range).
The Transitions from Idle to Chase and Chase to Idle are as follows:
Attacking The Player
This Skeleton is actually equipped with two different attacks:
Attack1 and Attack2 Animations on Skeleton Game Object
The Attack1 is more of a downward swing, where Attack2 is an upward swing. So how are we going to differentiate which attack the Skeleton should use? We could make this decision random, but for the sake of this tutorial, we’re going to make it where it Triggers Attack1 then triggers Attack2. This is how we will accomplish this:
Under the Attack Super State, create the following Hierarchy:
Attack Super State
When we enter this State, we will have the AI enter a Flow Macro called AttackChoice where it will decide which attack needs to be Triggered. Notice there are 4 Flow Macros here instead of 2. This is because we have the option of attacking Left and Right. For this we will create 4 Flow Macros, and name them Attack 1 Left, Attack 1 Right, Attack 2 Left, and Attack 2 Right. We will also make a Transition to each of them from AttackChoice.
Open Attack Choice and make the following Macro:
AttackChoice Flow State Macro
When we Enter This State, we’re going to need to first Set the CanAttackObject Variable to False (This will trigger the Attack CD sequence that we will establish in a little bit). We then need to check the AttackInt. Essentially what we’re doing with this is saying that the Attack1Animation is going to be 0, and the Attack2 Animation is going to be 1. If the AttackInt is 0 we will then Add 1 to the existing AttackInt and get the Direction by checking theSprite Renderer Get Flip X node (If it is flipped by moving left, we will know the Skeleton is facing left and the Player is to the Left). If it is True, we will Trigger the Attack1LeftCustom Event, if it is False, we will Trigger the Attack1RightCustom Event.
If the AttackIntis 1 (meaning it’s already run through the Attack1 on the last attack) we will Set the AttackInt Object Variable back to 0, check the direction with the Sprite Renderer Flip X and trigger either Attack2Left or Attack2Right depending on whether that reads True or False.
Now enter the Attack1 LeftFlow state and create the following Macro:
When we Enter this State we want to Play the Attack1 Animation. But now, we’re introducing something new. We’re going to use an Animation Event called SwordAttack to Trigger the directional Attack using a Custom Event called Attack (notice that the index is 1, meaning it’s the 2ndchild under the Skeleton Game Object). In order to to have this Flow Macro do it’s job, we’re going to have to add something to the Attack1 Animation.
Under the Animation Tab, we’re going to select Attack1 and go to the Frame at0:06. We will then click the Add Animation Event Tab, and from the Drop Downon the Top Right under the Inspector Window, we will select Trigger Animation Event (Animation Event) as shown below:
Attack1 Animation Event
We will then enter in “SwordAttack” into the String field like so:
Animation Event for Attack1 Animation
You will also need to set up another Animation Event for when Attack1 Ends so that we can tell the Game Logic to return back to an Idle State. You can do this by doing the following:
Attack1 End Animation Event
Here we go to 0:08 in the frame, and add another Animation Event by clicking the Add Animation Event Tab, then type in AttackEnd into the String Field.
Now copy everything under the Attack 1 Left State, and paste it under the Attack 2 Left State and make the following change:
Attack1 Right Flow State
The Attack2 Left Flow State will change the Animation State Name to Attack2 like this:
Attack 2 Left Flow State
The Attack 2 Right Flow State will not only change the Animation State Name to Attack2 but the Child for the Attack Custom Event will be set to 0 like so:
Attack 2 RightFlow State
The Transitions will be as follows:
The Skeleton’s Attack Super State Transitions
The Attack Super State is almost setup, we just need to add the AnimationEvents to Attack2 that we have on Attack1. It will look like the following:
Attack2 SwordAttack Animation Event
At 0:06 we add an Animation Event and call it SwordAttack just like in Attack1.
At 0:08 we add an Animation Event and call it AttackEnd2.
We now need to add the Transitions to the Combat Super State which are as follows:
In order to test our changes if the Skeleton Chases and Attacks the player, we’re still going to have to Trigger Combat Mode from Non-Combat Mode and vice versa. We will do this inside our State Handler Flow State, but before we set that up, we need to create 3 new Super Units and place them each under the Enemies/Skeleton folder:
The Range Check (Less) Flow Macro:
The Range Check (Less) Flow Macro
Don’t forget to set the Default Value on this one!
The Range Check (Greater) Flow Macro:
The Range Check (Greater) Flow Macro
Don’t forget to set the Default Value on this one too!
The XRange2Player Flow Macro:
The XRange2Player Flow Macro
Not only does this one need to have it’s Default Value set to True you’ll also notice we use an Absolutenode in this graph. The reason we do that is because we don’t want a negative number when we’re calculating our distance. The Absolute node takes any negative number and converts it to a positive number.
Entering & Exiting Combat
Now open up the State Handler Flow State on the Skeleton State Machine:
The Skeleton Super State Machine
This will be what the State Handler will look like when we’re done (It’s a lot but don’t be intimidated we’ll work through this one section at a time!)
The State Handler Flow State Macro
Attack Cool Down
Remember when we triggered the attack and initiated the Attack Cool Down? Well, this is where that is going to be reset to allow us to attack once again. Build the following nodes to this Macro:
The Attack CD Nodes
This function essentially just checks if the Skeleton’sAttack CD has begun. This will happen whenever the CanAttack is set to False. We will then run the flow into a Timer’s Toggle, run the AttackCD Object Variable into the Duration, and when it’s completed, we will set the CanAttack Object Variable back to True.
Enable Combat Mode
The Enable Combat Nodes
Here we use the Range Check (Less)Super Unit that we created plugging in the AgroRange as the Range Value. In other word’s if the distance between the Skeleton and Player is less than the AgroRange (currently set to 4), Combat Mode will trigger because we’re setting the Combat Object Variable to True.
Disable Combat
The Disable Combat Nodes
Here, we run an Update Event into a branch checking if Combat is True. If it is, we use the Range Check (Greater) Super Unit we made with the LeaveAgroObject Variable (currently set to 7) in the Range Value node. In other words, if the Distance between the Skeleton and the Player is greater than the LeaveAgroObject Variable, we will then set the Combat Object Variable to False.
The Enable/Disable InRange Nodes
This set of nodes is responsible for determining whether the Skeleton Game Object is in attack range of the Player. We begin by checking if the Skeleton is in Combat by using the Combat Object Variable as the Boolean of the Branch Node. If it isn’t in Combat, we set the InRange to False (a failsafe if for some reason the Skeleton leaves combat, without the Player running out of range). If the Skeleton is in Combat, we will check the Player’s X Position, and either Flip the Sprite Renderer and Change the X to –1, or we will Unflip the Sprite Renderer and Change the X to 1. After this is completed, we will do a Range Check with the Range Value set to 2. If the distance between the Skeleton and Player is less than 2, it will set the InRangeObject Variable to True. If it isgreater than 2, it will set the InRangeObject Variable to False.
Enable / Disable Idle
The Enable/DisableIdle Nodes
This one is pretty simple, we run an UpdateEvent into a Branch checking if Combat is True. If it is, we check the Range on the X with the X Range 2 Player with 1.5 plugged into the Range Value. In other words, if the distance on the X between the Skeleton and the Player is less than 1.5, we will stop/enable movementby setting Idle to True or False.
Return to Combat Idle
The Return to Combat Idle Nodes
This last little set of nodes needs to also be setting somewhere in your State HandlerFlow State Macro. This is where the Animation Events, both AttackEnd and AttackEnd2 will trigger the Combat to Idle Transition by Triggering the Custom Event CombatIdle.
I know this was a pretty intense Flow Macro (and we’re not quite done adding to it), but this is how we’re not only able to escape Animator Hell, it’s also how we can easily switch between states.
We just need one more little addition and we should be ready to test out all our hard work! Add the following nodes to the Transitions between Non-Combat to Combat and Combat to Non-Combat:
SkeletonNon-Combat to CombatTransitions
One more little issue and we’re all done with the CombatPortion. In order to be able to send the damage to the PlayerGame Object, we need to ensure that the Overlap Circle on the SkeletonGameObject’s AttackR and AttackLEmbedded Macros are actually hitting the Player and one of the Player’sComponents. We can easily do this by performing the following:
PlayerGame ObjectInspector Settings
Select all the ChildedGame Objects on the Player, and set the Layers on them to Default. This will ensure that only the PlayerGame Object will get hit (not any of his childed objects).
Be sure to click Override and Apply All on your Player to apply changes to the Prefab.
Okay, now when you test things out, your Skeleton should not only Chase the Player when he gets close enough, it should also Attack, Idle, and Return to Patrol when you get far enough away. It should also trigger the correct amount of damage on the Player! Wonderful! Only a few more things to add and we’re all set!
Hurting The Skeleton
Now that the Skeleton can hurt the Player it would be nice if we could hurt it back! To accomplish this, let’s open up the HurtFlow State:
The SkeletonSuper State Machine
For this State you’re going to need to make the following Macro:
The Hurt Flow State
Let’s break this one down:
Hurt Flow State – Part I
On Enter State we’ll play the Hurt Animation, Trigger Combat, and Set the HealthObject Variable to whatever the current Health is subtracting the SwordDamage Scene Variable is (we set this up in the Complete 2d Player Controller – See, I told you that you needed to do that one first!).
The Hurt Flow State – Part II
Next we’ll run the flow into a Health Check by checking if the Current Health is now Greater than 0. If it’s not, we set the Dead Graph Variable to False.
Next, we’ll need a Transition from Combat:
Here we call another Animation Event called HurtEnd (we’ll set this up in a second). Whenever HurtEndTriggers, we’ll check a newly created Dead Graph Variable (this is not the same Object Variable that’s on the Skeleton Game Object). We’re using a Graph Variable here because nothing else will ever need to reference it. We’re adding it here to determine whether we’ll trigger the Death Sequence or not with our 2 Custom Event Triggers, Death and Hurt2Combat.
For the Dead Graph Variable all we need to do is set it up in the Variables Window by clicking on the Graph Tab and entering the information into the Field Below, like so:
Now we can setup the Transitions:
Skeleton Super State Hurt Transitions
Next, we need to setup for the Hurt State is to create the HurtEndAnimation Event as shown below:
The HurtEnd Animation Event
Select the Hurt Animation in the Animator, and add an Animation Event at 0:04 and enter “HurtEnd” into the String field.
The final thing we need to do is set the Skeleton Game Object’s Layer to Enemies so that when our Player Attacks (again, this was set up in MyComplete 2d Player Controller Series), it will trigger the “Damage” Custom Event on the Skeleton.
Now, when we test our game, we should see that we can not only Hurt the Skeleton, but when it’s health reaches 0, it triggers the Dead State. Let’s set that up now:
The Dead State
Open up the Dead Flow State:
Inside we will create the following Macro:
The Dead Flow StateThe Dead Flow State – Part I
On Enter State, we set the Dead Object Variable to True which will refuse to allow movement, or any attacking to occur by accident. We will also play the Death Animation.
Next we’ll setup the Death Sequence:
The Dead Flow State – Part II
Here we once again Trigger this Event with an Animation Event called DeathEnd (we’ll set it up next). Then we use a Sequencenode set to 4Steps to split the Flow into 4 parts at once. We’ll first Set the Velocityto 0 on the X & Y. We do this so that if there was any movement before, it will immediately stop. Then we Set the Gravity Scale to 0. We do this because of the next part where we Disable the Collider 2D Component so that the Player can now move through this Game Object. If we didn’t set the Gravity Scale to 0, the Skeleton would fall through the floor. And finally, we set the Game Object to Destroy itself after 2 seconds.
It’s also important that we make sure that the Animation Event is set as a Coroutine (we do this so we can use the Wait Node). You can do this by clicking on the Eventnode (this works for all events), and clicking the CoroutineCheck Box, like so:
How to Enable a Coroutine
Now we need to add the Blink Effect:
For this we’re running the flow from the 1st Sequence into a Wait node, which will delay the flow for 1 Second before triggering the Death Custom Event (we’re doing this so that there is a 1 second delay before the Skeleton starts blinking). After 1 Second, the Death Custom Event will Trigger, which will wait 0.1 seconds, then Disable the Sprite Render, wait 0.1 seconds, Enable the Sprite Renderer, and then Trigger the Death Custom Event again. This will of course repeat in a loop until the Game Object Destroys itself.
Last we need to setup the DeathEndAnimation Event:
The DeathEnd Animation Event
Select the Death Animation on the Skeleton Game Object, add an Animation Event at the frame at 0:04, then set the Function to Trigger Animation Event and type in DeathEnd in the String Field.
Now when you test, you should see that the Skeleton not only dies, it blinks until it disappears! Awesome!
The Block State
This last state is entirely optional, but I thought it was a nice feature for the Melee combatant that it requires just a little bit of finesse to kill the enemy. The way the block works is the Skeleton has to swing it’s sword leaving a 1 Second Window where it is vulnerable. Once attacked, though, it resets the window back to 1. In other words, as soon as you start landing blows, it is relatively easy to kill.
There are actually several things going on with this function. Not only do we need to block instead of doing damage when the Skeleton isn’t vulnerable, we need to give some kind of indicator through a particle effect that the block has taken place, as well as slightly push the Player backwards. This is how we will set this function up:
Open up the Block State:
The Skeleton State Machine
We’ll begin by adding the following nodes to this Macro:
The Block State MacroPart I
Upon Enter State, we begin by Playing the Animation “Shield” (because that’s what our animation is actually called). Next we check the Player’s X Position and Add Force to the Left or to the Right. The Rigidbody 2d Add Force node needs to have it’s Mode set to Impulse(there are several different nodes, make sure you select the one with Mode) to briefly push the Player backwards. For this, we’re going to use a Vector 2 Create node and only plug information into the X and leave the Y at 0. For a Left Impulse, we’re going to Multiply the Pushback Object Variable (currently set to 3) by -1. For a push back on the Right, you’ll notice we don’t need to do this.
Next let’s create some Animation Events to carry out more functions when we want them to. On the Shield Animation, we’re going to actually need to add two Animation Events:
Shield Animation Event # 1
One at 0:2 called “Block“:
Shield Animation Event # 2
And one at 0:4 called BlockEnd.
Before we continue with the BlockState Macro, let’s make a new Block Effect!
The Block FX
For visual effect, we’re going to create an effect that will trigger when the Skeleton blocks. For this you will need to import the following file:
This is an explosion Sprite effect that I created that will need to be sliced in the Sprite Editor. Let’s do that now.
Import this Sprite into your Project Folder (I placed mine under Assets/PlayerController/Sprites/Enemy/FX).
Click on this Sprite and enter the following settings in the Inspector Window:
Explosion Sprite Inspector Settings
Set the Sprite Mode to Multiple, the Pixels Per Unit to 75, the Filter Mode to Point (no filter), and the Compression to None. Finalize your settings by hitting Applyand then click the Sprite EditorButton.
Sprite Editor Settings for Explosion Sprite
Click the Slicedrop down, under the Type select Grid By Cell Size, set the Pixel Size to x=47 y=56, then click Slice. Be sure to Applyyour settings and you should now see your Sprite is separated in the Project Folder Window as seen below:
Now Select all the sliced up sprites and drag them into your scene somewhere; you will see a new window pop up asking where you want to save your new Animation (this is creating a new Game Object and has already added a Sprite Renderer, and Animator Component. I called this Animation“Block” (I saved it under the Assets/PlayerController/Animation/FX folder) as shown below:
Rename this new Game Object “Block” in your Hierarchy Window:
Now give it the following settings in the Inspector Window:
The Block Inspector Settings
For this Game Object I created a new Sorting Layer (underneath Player so that it renders in front of the Player) called FXand assigned this Game Object to that Layer. I also gave it a Flow Machine and set the Source to Embed. I also assigned the following information in the Animation Tab:
Block Animation Settings
Selecting the BlockAnimation, we set the Samples to 12 so that it plays at an appropriate speed, at frame 0:05 we add an Animation Event, set the Function to TriggerAnimationEvent and type “End” into the Stringfield. For the EmbeddedFlow Macro, create the following Graph:
The Block Embedded Flow Macro
For this Graph, we tell the Game Object to Destroy Itself whenever the End Animation Event Triggers. This will give us the full animation, but also disappear when it’s done.
We don’t want this Animation to Loop so we’re going to have to turn off the Loop Time on the Animation in the Animator by Double Clicking the Animationand uncheckingLoop Time, like so:
The last thing we’re going to need to do is drag this Game Object out of the Hierarchy Window down to the Project Folder (I put mine in Assets/PlayerController/Prefabs) to create a Prefab, like so:
Now you can delete the item out of your Hierarchy, we will call it when we need it and it is set to destroy itself whenever called and the Animation is done.
The Block Flow State (Part II)
We’re now going to add the Transition To Combatand the Block Particle Effect to our Block Flow State Graph.
Transition to Combat is simple:
The Block Flow State (Transition to Combat)
Whenever the BlockEnd Animation Event is Triggered, we will trigger the Block2Combat transition.
The Block Flow State (Block Particle Effect)
Whenever the Block Animation Event is Triggered, we want to get the direction of the Skeleton by checking whether the Sprite Renderer’s X is Flipped. If it is, we want to Instantiate the BlockGame Object we created earlier (this will spawn that item in!). We want this to be positioned on the BlockedLChilded Game Object (the 4th Child under the SkeletonGame Object) which is at an Index of 3. We will also need the Quaternion node (which is a little silly in my opinion that we have to do this, it should be 0 rotation by default).
For the this Game Object to spawn at the Right side, we repeat all the same steps, but plug 2 into the Index (the 3rd ChildedGame Object under the Skeleton Game Object).
Now edit the following Transitions:
Skeleton State Machine Transitions
If you test at this point, you will notice that nothing has changed. And that is because there are a few places we need to work on before our Skeleton can Block!
First open up the Hurt Flow State and add the following nodes:
The Hurt Flow StateThe Hurt Flow State (Block Check & Trigger Block)
Before we ever play the Hurt Animation, we need to first check if Block is Active or if the Skeleton is Vulnerable. If Block is True, we’re going to Trigger the Block Custom Event. If Block is False, we’re going to carry out the Hurt function as normal.
Now when we test our game, we should see that the Skeleton blocks, but there are a couple problems. First, the BlockEffect doesn’t spawn in the correct location, and second, no matter what we do, the Skeleton always Blocks!
Let’s adjust the Block Effect first!
Block Effect Adjustment
Believe it or not, the problem isn’t with the BlockEffect, but with the Skeleton ShieldSprite. To correct this problem we need to adjust the SpritePivot Point. Navigate in your Project Window to the Skeleton’sShield Sprite (mine is located in Assets/PlayerController/Sprites/Enemy/Skeleton). Select the ShieldSprite and select the Sprite Editor, like so:
Skeleton Shield Sprite Inspector Settings
When you click on the first Sprite in the Sprite Editor Window, you should notice that the Pivot Point (the little blue circle) is not centered with the Skeleton as shown below:
Skeleton Shield Sprite
To adjust this, you can either drag the little blue circle over, or you can edit the settings for more specific control.
Skeleton Shield Sprite
Under Pivot, change it from Centered to Custom. Under the Custom Pivot, change the X to 0.6 for all four of the Sprites (click on them each and make this change 4 times). Now you should notice the Pivot Point for the Skeleton has now moved to the center of it’s body. Be sure to hit Apply on the top right to apply your changes.
Now when you test, you should see that the BlockEffect spawns in the right location. If it doesn’t try working through this step again and adjusting the Custom Pivot more to your liking.
Adding Vulnerability
We do want to be able to hit our Skeleton, but we want it to Block when we don’t get the drop on it. We’re going to adjust this by establishing a window of Vulnerability after the SkeletonSwings.
Open up the Attack Super State under Combat because we’re going to make changes to each of the 4 Attacks:
The Skeleton’s Attack Super State
Under each of these attacks, we need to add on the following nodes:
The Skeleton’s Attack1 Left Flow State
Here we’re setting the Object Variable VulnerTimeto whatever the current Game Time is. This will help us establish a Cool Down in just a second. We’re also setting the Block Object Variable to False (Be sure to make this addition to ALL FOUR ATTACKS!)
We also want this Cool Down to Reset whenever we hurt the Skeleton. For this, open up the Hurt Flow State and add the following nodes:
The Hurt Flow State he Hurt Flow State
Here we’re performing the same function and Setting the VulnerTime Object Variable to the current Game Time. This will allow us to reset the Cool Down whenever the Skeleton gets hit!
The last change we need to make is going to be inside the State HandlerFlow State:
The Skeleton State Machine
Here we’re going to add the Block CD function:
The State Handler Flow State The State Handler Flow State (Block CD)
Here, we run an Update into a Branch to see if the Block Object Variable is ever False. The moment it triggers as False, we’re going to run the Flow into another Branch which will check to see if the Current GameTime is Less or Equal than the VulnerTime Object Variable by Subtracting them. This will allow us to create the Cool Down because whenever the Skeleton attacks or gets attacked, the VulnerTimeObject Variable will reset bringing it under the VulnerCDObject Variable (which is currently set to 1). Whenever it isn’t Less or Equal, it will reset the Block Object Variable to True.
Okay now when you test, you should see that the Skeleton can Block until it Attacks which makes it Vulnerable to Attacks from the Player!
Making a Skeleton Prefab
I would highly suggest turning your Skeleton into a Prefab as well. The reason I haven’t suggested this until now is because I didn’t want to have to update it every time we made a change. To do this, just select your Skeleton Game Object and drag it into your Project Folder (I put mine in Assets/PlayerController/Prefab) like so:
You can now delete your Skeleton in the Hierarchy or add several into any scene (keep in mind, however, that the Player’sSwordDamage is a Scene Variable meaning you will need to add that to every scene you create).
Conclusion
Wow! You made it to the end and you should now have a fully functional Skeleton MeleeEnemy that not only Patrols, but also Chases the Player, Stops at Walls and Ledges, Attacks the Player, Blocks, takes Damage, and even gets Hurt and Dies!
I hope this tutorial was helpful for you. It was certainly a lot of work to make (it took me about 60 hours just for this tutorial blog, not countingthe primary build or the tutorial video). If you enjoyed it and would like to see more of this kind of content, perhaps you would consider supporting me on Patreon!
And just to show my Patreonssome love and appreciation for their support I’ve included exclusive Patreon Content for an Enemy Fire Worm that fires Projectiles and a Flying EyeEnemy that flies around attacks the Player!
If your friends walked off a cliff, would you do it too? Unfortunately, in the real world if we ever step off that cliff, we won’t have time to correct our mistake and would have about 3 seconds to live with the poor decision. Fortunately for our players, we as game designers can control giving them a little bit of grace. Many successful platform games have what’s called “Coyote Time” and it’s so subtle you probably didn’t even know it was there. “Coyote Time” is the effect of allowing the player to jump for a short amount of time, even after his feet have left the platform.
You may be wondering, “Why in the world would I put something like this in my game? Especially when players aren’t going to notice it’s even there?”
This really requires us to put ourselves in the player’s shoes. As we’re building games, we can easily master the controls while we’re building them, so jumping at the right time becomes second nature. For playtesters, however, this is something they will certainly struggle with.
Nobody likes walking off an edge to their death, especially when they know they pressed the jump button. Adding a little delay in your jump even after you leave the platform is extremely considerate for the player and is really easy to do.
Getting Started
The Coyote Jump can be added to any 2d player controller that you have, and just to show you this is the case, I’m going to be using My Complete 2d Player Controller as a template. If you’re interested in building this system for yourself, you can do this by clicking link below:
My 2d Player Controller Playlist
For this build I’m going to be using Unity and Bolt Visual Scripting. Assuming you already have a jump function established in your player controller, all we’ll need to do is add some object variables to our player as well as adjusting some of the macros.
Before I get started, let me add a quick word on how my jump function works. My player controller uses a 2d Capsule Colliderfor the body and a 2d Box Collider that is set to a trigger and lets me know when the player is touching the ground vs. being airborne. For example:
As I show my 2d player controller series, the Grounded Collider uses a macro that triggers an event when the player collides with and leaves the ground. That macro looks like this:
The Ground Collider Flow Macro
The OnTriggerEnter&Exit Super Unit looks like this:
The OnTirggerEnter&Exit Super Unit
Coyote Time for Ground Collider
In order to add some Coyote Time to our jump, we’re going to add onto the existing Ground Collision Macro when the player leaves the ground. We will add the “Coyote Time” function here:
The Ground Collider Flow Macro
Here’s the close up view of the addition:
In this function, we’re setting a new Object Variable called “LastGrounded” on our Player Game Object by getting the Application Variable called Player which is set up as a singleton principle (For more information on how to do this, go back to my 2d Player Controller). Whenever our collider exits the ground, we’re setting the LastGroundedObject Variable to the current Game Time.
Coyote Time for Player Game Object
Next we need to setup some new Object Variables on our Player Game Object. Add the following to your player:
Player Game Object Variables
In the Ground Collider Flow Macro, we referenced the LastGroundedObject Variable and set it to the Game Time, this we will need the LastGroundedObject Variable to be a Float.
The CoyoteTime will also be a Float, and for testing purposes, we’ll set this Float to 0.1.
Last we’re going to need a new Boolean Object Variable called “CoyoteJump” and go ahead and set this to True.
My existing Jump Function on my Player Controller looks like this:
Jump Super Unit
We’re going to also need to make the following changes to this Macro:
Changes to Jump Flow Macro Super UnitCoyote Time Check
First we add a Coyote Time Check by running the Input into a Branch that checks if the CoyoteJumpObject Variable is True. If it is, it runs the flow into the existing Jump function. If it’s not, then it checks to see if the player is Grounded(the other condition to jump). The last thing we need to do is set our CoyoteJumpBoolean to True or False. We do that by adding the following units:
Setting the CoyoteJump Boolean
For this, we run an Update Event which checks to see if the current GameTimeMinusthe LastGrounded time is Less or Equal to our CoyoteTime delay. If it’s True we set the CoyoteJumpObject Variable to True, if it’s not, we set it to False.
Remember, if you want to adjust the delay, all you have to do is set the CoyoteTimeObject Variable in the Inspector Window higher or lower according to your desire.
Conclusion
You should now see that your player should have a little extra time to jump when he leaves the ledge! Hopefully this tutorial was helpful for you. If so, maybe you’d consider supporting me on Patreon! Thanks for joining me!


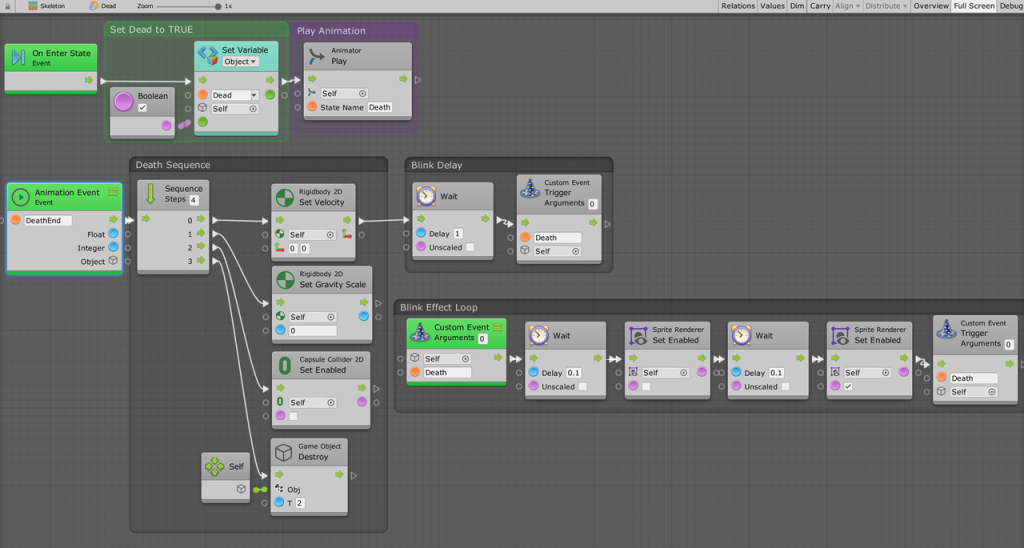


