Brief Overview
In this tutorial, we’re going to use Unity + Bolt Visual Scripting to drop stacked items back into our world and implement some macros so we can pick them back up again. Let’s Begin!
Getting Started
For this tutorial, we’re going to need to create some new Game Objects and Macros to ensure that we can instantiate a stacked item as well as work out, in these Macros how we can pick these items back up again.
Full transparency here, I’ve got some bad news and some good news. The bad news is, for this part of the tutorial, we will actually need one C# Script. I know, I know. What happened to no coding experience needed?
But wait, there is good news! An awesome individual in the Bolt Discord community, named JasonJonesLASM, made this C# Script and it works like a charm. And all we’ll have to do is simply import this script into a Scripts folder, and Pull it in using the Unit Options Wizard. Then we’re good to go! You won’t have to write a single line yourself! See, that still counts… well.. Kind of…
Needed Script
Okay, for this build you’re going to need a C# Script called “XFlowMachine” (once again, brought to you by JasonJonesLASM). You can download this file by clicking the link below:
XFlowMachine Download
Once you get this downloaded, create a new folder in your Assets –> Inventory System folder called “Scripts” and place the file inside…
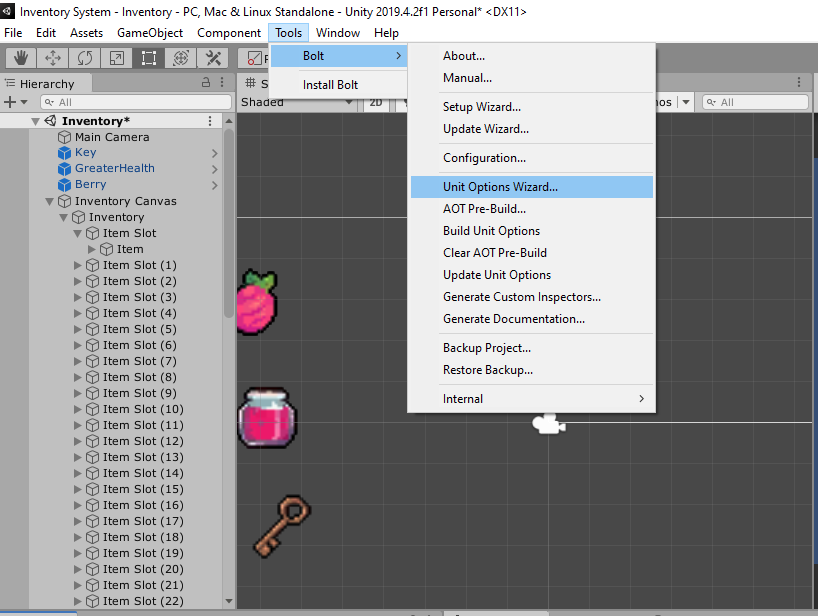
Next go to Tools –> Bolt –> Unit Options Wizard:
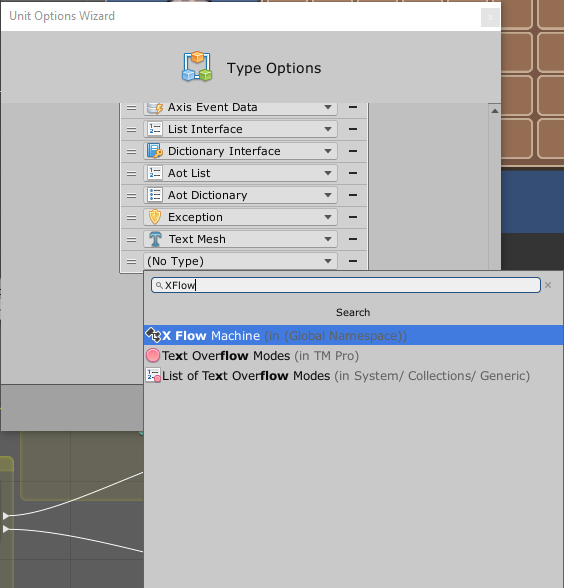
Scroll down to the bottom and hit Next, then on the Type Options click the “+” button and after clicking the drop down, type in “XFlow” and add the XFlowMachine Type to your Unit Options and hit Generate.
And that’s it! You now have the needed Script for this part of the build. See, that wasn’t all that bad! Thanks again to JasonJonesLASM for making this so easy!
The Stack Manager
What does that Script do exactly? Well, it makes it so we can Instantiate a Game Object that has a Flow Machine on it that already has a Flow Macro implemented.
In other words, when we instantiate a Stacked item, we’re actually creating something brand new from scratch. We’re then going to have to create components on the stacked item as it’s being generated so that we can interact with it. If that doesn’t sound cool to you, then you’re not paying attention!
In order to accomplish this, we’re going to need a Game Object to manage all of the stacks of items and give these stacks the necessary Components. This is where we’re going to need a “StackManager” Game Object.
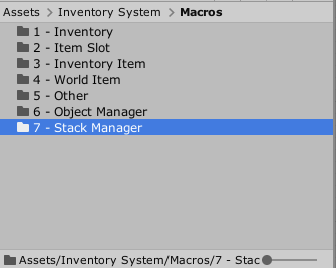
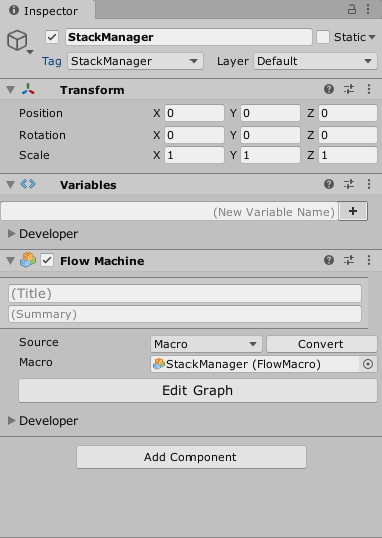
Right click on the Hierarchy and create a new Empty Game Object and name it “StackManager”, create a new tag called “StackManager, assign it to this Game Object, and reset the transform on it. Add a Flow Machine to it, create a new folder under the Macros folder and call it “7 – Stack Manager”.
Clicking on our StackManager Game Object, create a new Flow Macro, place it under the Stack Manager and call it “StackManager”. When you’re done it should look like this:
The Amount Prefab
For each stack, we’re going to need to replicate, not only a stacked item, but also the amount text on the item. The Stacked Game Object itself will be a little bit complex because there are many different types of items. But fortunately the amount text will always be the same Game Object. We can actually adjust this prefab with no problems at all.
Right Click your Hierarchy and create a new Empty Game Object, reset it’s transform, and rename it Amount.
Add a TextMeshPro – Text component to this Game Object and set the Text to “x99“.
Set the Rect Transform to the following:
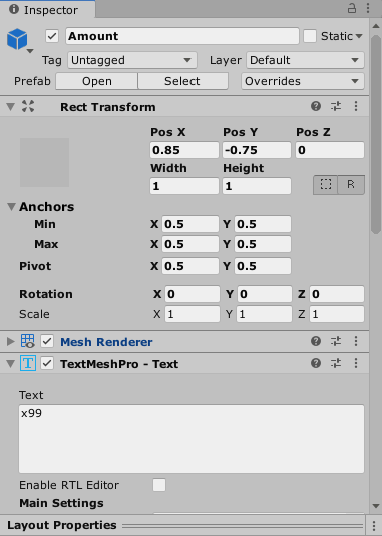
These settings will place this text on the game object to the bottom right of the image. Using the same process as before in Tutorial 1 of this build, I set up a new TextMeshPro font called “JungleAdventurer”. If you need a refresher on how to set up a font, go back to the first tutorial under the Amount section:
I got the Jungle Adventurer Font from dafont.com here:
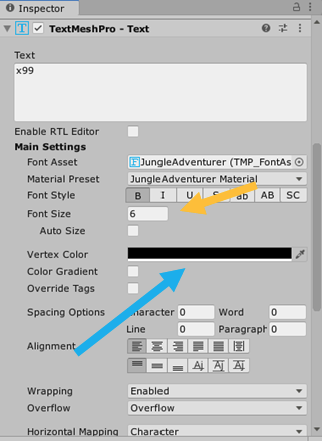
Once you get this completed set the font size to 6 here and the color to black here:
Under your Prefabs folder, Left click and drag any one of the Amount Game Objects in the Hierarchy down to the prefab folder. This will cause the original Amount Game Object to turn blue (meaning it’s now a prefab). Right Click the Amount Game Object in the Hierarchy and select Unpack Prefab. We will leave the Amount Prefab in the Prefabs folder alone for now.
The NewStack Flow Macro
Before we can set up the StackManager Game Object’s Flow Macro, we need to first establish the Flow Macro that our newly created Stacked item needs to have on it once created.
In the Macros –> StackManager folder, create a new Flow Macro and call it “NewStack“. We’ll come back to this Flow Macro in a few minutes.
The StackManager Flow Macro
Under the StackManager Flow Macro, we need to create the following Macro:
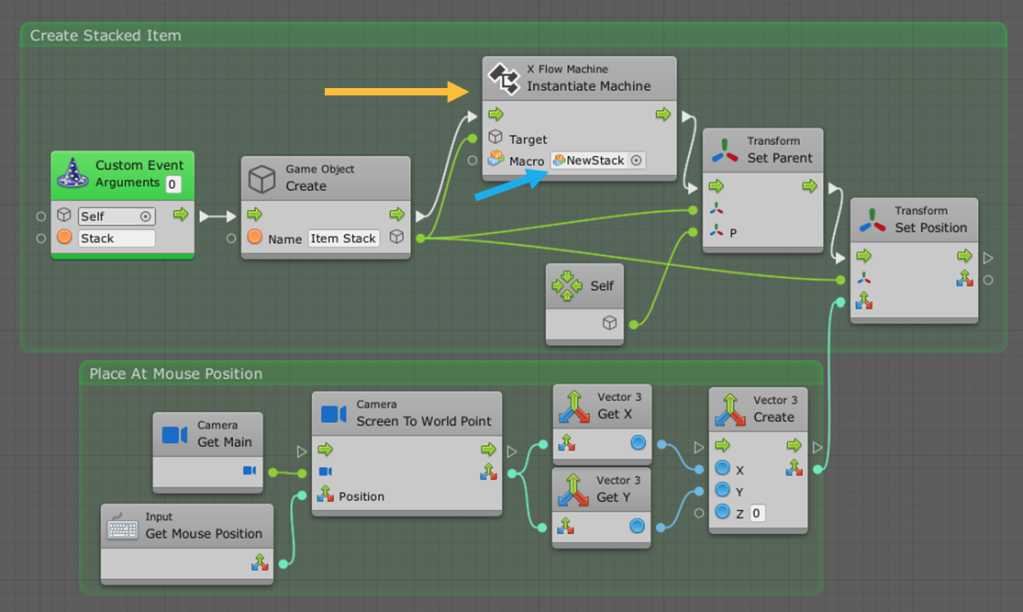
We will actually set up the trigger to the Stack Custom Event in just a second. For let me explain what the rest of this Flow Macro is doing. We first Create a Game Object and call it “Item Stack”. We will then use the XFlowMachine C# Script (that was so generously provided by JasonJonesLASM). We set the Flow Macro for this Instantiated Game Object to the “NewStack“ Flow Macro we just created. We then set the Parent of the Instantiated Game Object to the StackManager Game Object and set the Instantiated Postion to the place in the world we clicked with our mouse with the Screen To World Point unit, which gets the Camera’s coordinates, and translates Pixels to Units. Again, we only get the X and the Y of the Camera’s position because it sets on a -10 on the Z.
And the StackManager Flow Macro is now completely done… but… you didn’t think it would be that easy, did you?
Well, it turns out we actually have a lot left to do if we’re going to be able to interact with this Instantiated Game Object. First, let’s set up the other side of the Stack Custom Event.
Changes to the Object Manager
Open up your ObjectManager’s Flow Macro and navigate to the ReturnItem Flow Macro. In the last tutorial, we set up the right click to drop one item, but now we’re going to set up the left click to drop a whole stack.
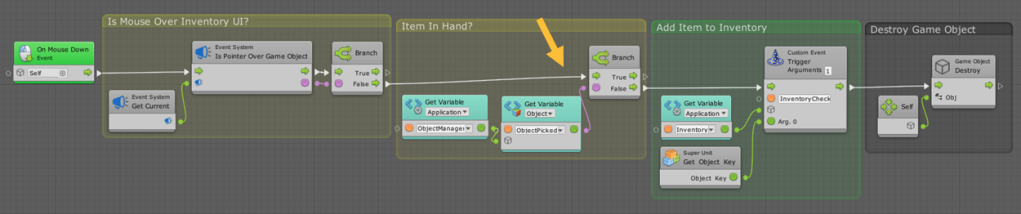
Add the following Units to the ReturnItem Flow Macro:

When we trigger a Left Click, we check to see if we’re over our Inventory UI, if we’re not, we check to see if something is on our ObjectManager (in our hand), and if so, we trigger the Stack Custom Event on the StackManager Game Object.
The AddComponents Flow Macro
Under the Macros –> 7 – Stack Manager Folder, create a new Flow Macro Super Unit and name it “AddComponents”. This is the overview of what it should look like:
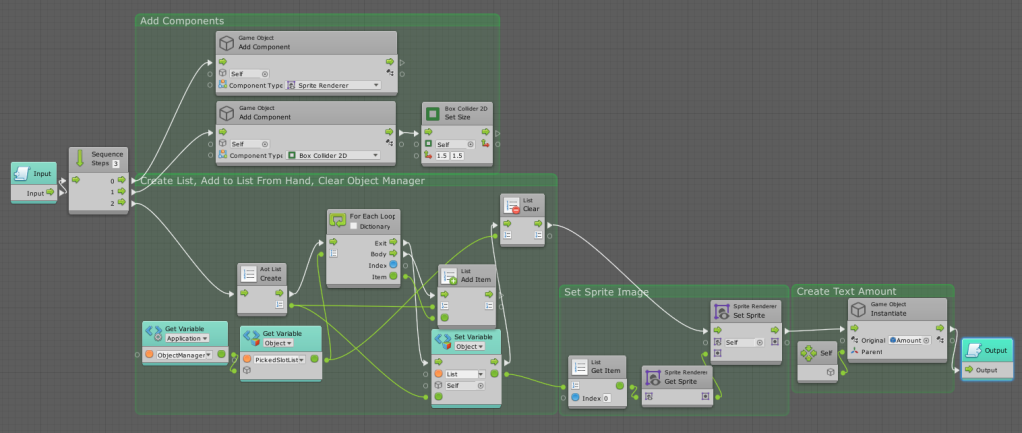
Let’s look at each of these sections in detail.
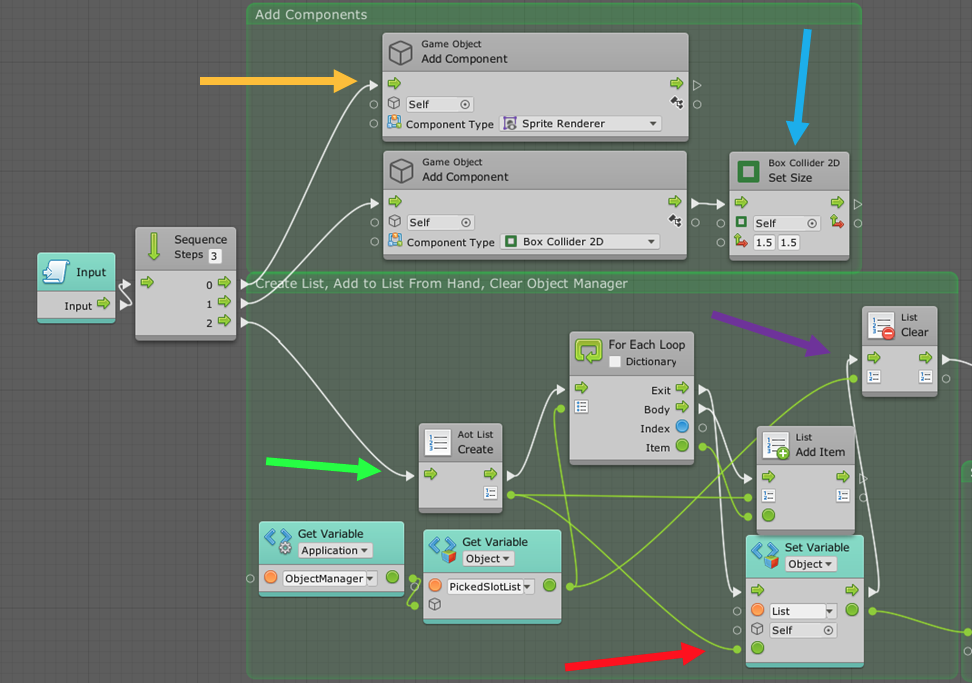
This Flow Macro Super Unit will be responsible for creating the Components on our created stack when we drop a number of items into the world. The AddComponent Unit is a really cool unit that can add any component to a Game Object while the game is in Play Mode (which is awesome!). Here we are adding a Sprite Renderer and a Box Collider 2D, and then Setting the Size of the Box Collider 2D to an X and Y of 1.5. We need the Box Collider 2D if we’re going to be able to click on the Game Object.
**Special Note** – For games where we would pick this game object up instead of clicking on it, there would be a few more steps to this process. For example, Setting this Collider to Trigger with the Player Tag instead of leaving it clickable.
Next we Create an Aot List, add all of the items in the PickedSlotList on the Object Manager Game Object to the List, then when we’re done, we Set The Object Variable “List” (which we’re now creating) to the Aot List we just Created. Finally we Clear the PickedSlotList on the ObjectManager Game Object.
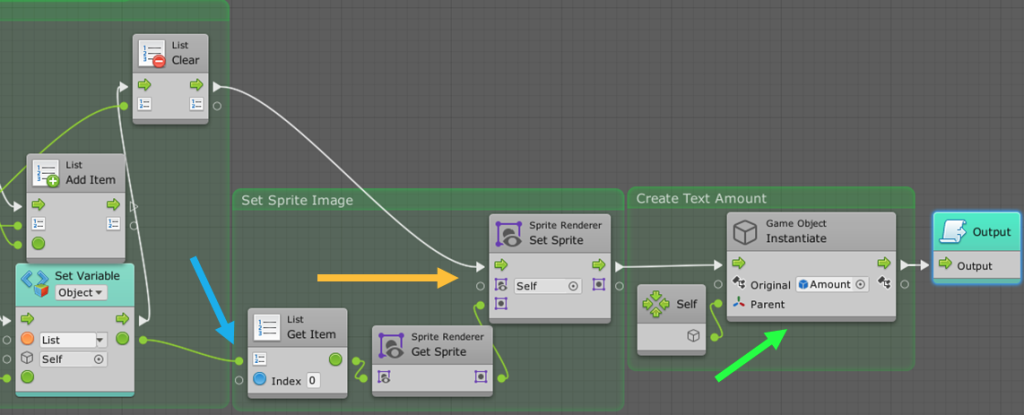
Next we Set the Sprite to the first Game Object in the List, and Instantiate the Amount Prefab we created earlier to be Childed under this Game Object.
The UpdateAmount Flow Macro
Under the Macros –> 7 – Stack Manager Folder, create a new Flow Macro Super Unit and name it “UpdateAmount”. This is what it needs to look like:
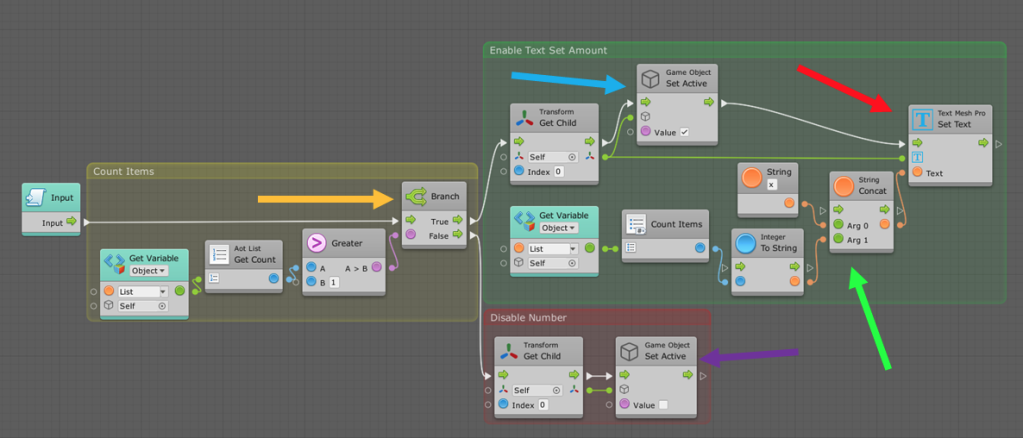
We first check the amount to see if it’s Greater than 1. If it’s not, we simply Disable the Child Game Object. If it is, we Set the Child Game Object to Active, and Set the Text to the amount of items in the List using an Integer to String running into a Concat with “x” running into Arg 0 and the Integer to String running into Arg 1.
The AddStack Flow Macro
Don’t worry, we’re almost done. Under the Macros –> 7 – Stack Manager Folder, create a new Flow Macro Super Unit and name it “AddStack”. This is what it needs to look like:
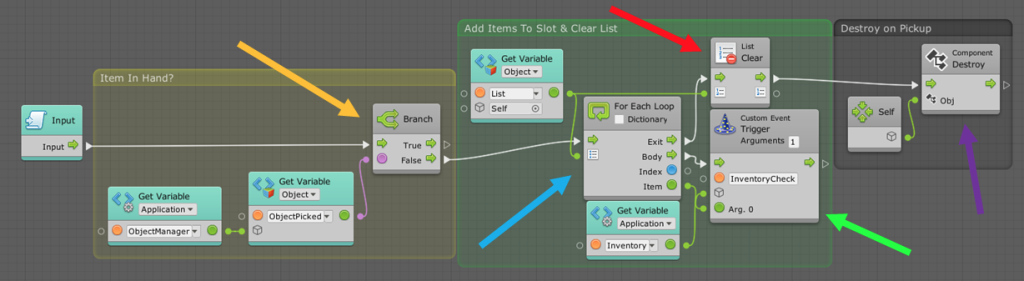
We check to see if an Item is in our hand because we don’t want to pick another object up until we’ve done something with the one in our hand. We then add all of the items in the List to our Inventory system with the For Each Loop running into the InventoryCheck Custom Event on our Inventory Game Object. We then Clear the List and Destroy this Game Object.
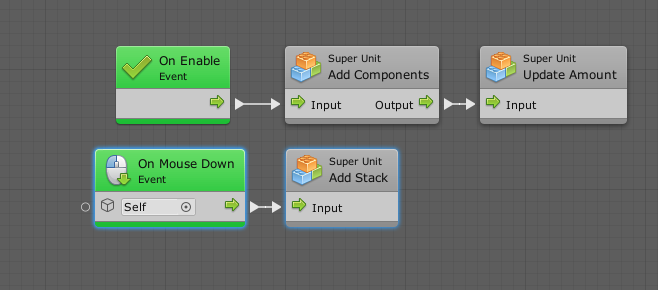
Now we just need to add these units to the NewStack Flow Macro like so:
Change to Item Flow Macro
Because we don’t want to pick items up in the world when we’re holding something, we need to add one little check in our existing Items Flow Macro. Under the Macros –> 4 – World Item folder, open the Item Flow Macro and add the following units:
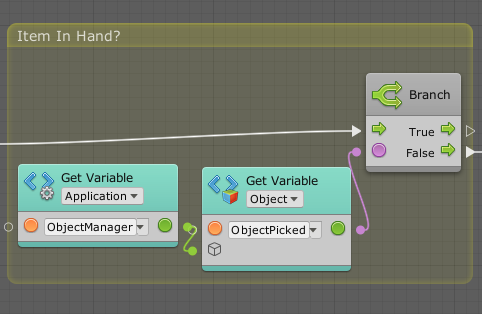
Now we should be all set!
Conclusion
Okay, now when you test your game, you should notice that you can not only throw out your stacks of Items and have the number of items reflect correctly, but you should also be able to pick them back up!
What if, however, we’d like to be able to split the game objects in the inventory and determine exactly how many items we want to split from it? Well, that’s what we’ll cover in the next tutorial.
If you found this tutorial useful, maybe you’d consider supporting me on Patreon! You can do this by visiting my Patreon Page here! According to your level of support, you could have access to my Private Discord Server, take part in Online Polls for Future Tutorial Content, get a Shout Out in one of my videos, gain Early Access to Future Tutorials, and even Download My Completed Project Files!
In the next tutorial, we’re going to create a Split Item UI and be able to have control over how many items we want to split.
Thanks for Joining Me,
 Megahertzs
PS: I’d like to thank the following people for helping me play test this system to find most of the bugs!
- MrVastayan
- JSM
- AliveDrive
- Jorotyn
Also I’d like to thank these contributors for being there to help answer my questions and even provide solutions for my problems:
- Zer0
- JasonJonesLASM
Couldn’t have done it without these guys!
